
Learn tips on how to ★ 3D PRINT MINIATURES & FIGURES ★ with the best possible results! Set up infill, speed, layers, cooling, and supports.
How to 3D Print Miniatures & Figures for Best Results
Every hobbyist aims to create a work of art to be proud of, whether it is through crafting, painting, or 3D printing. While working on your 3D-printed miniatures and figurines, consider these great tips for perfecting your masterpieces, and you'll exceed your expectations beyond limits!
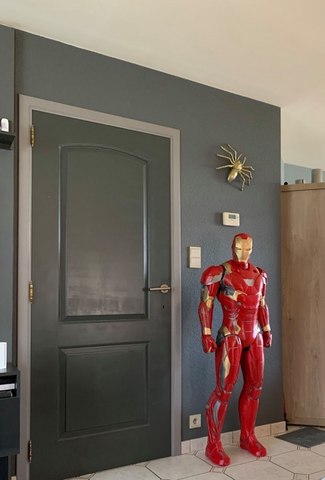
3D printing miniatures and figurines from famous movies, video games, and comics make iconic characters, starships, and other fictional models as widespread as 3D printing useful home tools and gadgets. Along with vases, hooks, door stops, and similar things, hobbyists today like to 3D print miniatures for their beloved tabletop games and recreate life-size figures of Iron Man, Groot, Mandalorian, and even real Batman cars for kids!
3D printed by Lies Brams, STL files by Gambody
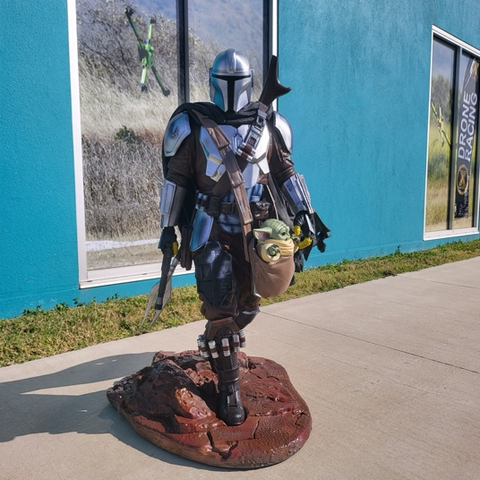
3D printed Zakariah MT, STL files by Gambody
No matter what 3D printer you use, FDM or resin, or what figure size you print (28-30 mm miniatures or 30-200 cm figurines), you can tune your slicer and machine to achieve the most incredible results from different types of printers and 3D printing materials.
3D Print Miniatures
You might have heard that it's best to 3D print miniatures on a resin 3D printer because it carefully builds every detail, unlike most FDM printers. But it is not always true.
In the world of tabletop games, 3D printed miniatures are designed to make the battlefield impressive and one-of-a-kind, make the game more exciting and memorable, and please all gamers. On one hand, 3D-printed miniatures look incredible when they are highly detailed. On the other hand, fans of tabletop games often don't care about details regarding their favorite characters used as props, role-playing pieces, terrain, or accessories. Thus, it doesn't matter much if you print your 0.28 mm minis with resin or filament. What matters are your slicer settings.
Tips for 3D printing miniatures:
- Layers -When you care for fine details, you can set up thinner layers while 3D printing miniatures. But prepare for longer printing times and possible problems caused by too many thin layers. If you don't care much about the intricate looks of your minis, increase your layer height and save some time.
- Supports- If your 3D printable miniatures have an upraised tail, wings, or something similar, you'll have to use supports to avoid issues.
- 3D printing speed- Unlike life-size or bigger figurines, 3D-printed miniatures can be built faster without sacrificing the details. If you go too slow, you might produce unpleasant drafts. But if you go way too fast, you might experience poor layer adhesion. So, slow down for the first layer to create a reliable base!
- Infill- The correct infill type ensures that your 3D print miniatures are of good quality and do not waste extra material. For most minis, you cannot go wrong with lightning or zig-zag infill pattern.
- Cooling- Ensure you have activated your cooling option while 3D printing miniatures in your slicer menu.

3D printed by Denis Mars, STL files by Gambody
3D printed by Nate Rice, STL files by Gambody
3D Print Figures: General Tips
When setting up your layer height (thickness) and number, find a balance between 3D printing time and quality. To make 3D printed figurines more intricate and beautiful, especially if you build a hand with tiny fingers or some tiny parts for your spaceship, you can switch to a 0.2-mm nozzle and play with a 0.15-mm layer height. You will spend much more time printing that part, but it will look precise! Also, when you work with thin layers, you should increase the number of your top or bottom layers to create a smoother effect.
Let your slicer generate supports as you 3D print figures that require them. All extreme overhangs and long bridges require support structures. Without them, the print might fail, and the bridges, overhangs, and angled parts might not form correctly.
Your speed defines whether 3D printed figurines will be of great quality or fail. Super fast speeds often lead to blob issues and can knock the model off your 3D printer bed. To avoid strings of filament, ensure that your printer head is not set up too low to move between extrusions, and tweak the retraction speeds to prevent drops of 3D printing material on your 3D printed miniatures, figurines, or life-size models.
Infill settings help hobbyists optimize the use of 3D printing material, strengthen 3D printed figurines, and extend their life. It is advised to keep the infill at about 20 percent for most projects, considering that some infill patterns (cubic, for example) increase the 3D printing time and use too much extra filament or resin. For life-size models and giant 3D printing figurines, increasing the infill to 30 percent or more is best.
Cooling is a big part of every FDM 3D printing project that works with PLA, no matter if you 3D print miniatures or life-size objects. 3D printers have a cooling fan that blows air to the model and helps filament layers set up. You can upgrade your fan based on your 3D printer model. And keep in mind that some 3D printing materials (ABS, PETG, etc.) don't need much cooling at all.
You can tweak your settings to improve 3D-printed miniatures, figures, and life-size models by playing with your slicer 3D printing speed, layers, infill, supports, etc. Gambody, for example, offers optimized 3D printing settings with each model and figurine you can download on gambody.com marketplace. Create masterpieces you'll be proud of!
